Failing.

by Lisa Lombardi in ,


I received two responses to my chair dilemma. My lovely mother suggested that I simply paint them, to which my immediate thought was, "NEVER." A mysterious second commentator recommended that I bribe my friends with beer and have them help with the sanding. While this was a wise suggestion, I unfortunately have no friends here in Boston that have even the slightest interest in refinishing chairs, and no amount of beer in the world would change that.

So I went with plan C: chemical stripping. It all sounded so simple — paint on the stripping agent (in this case, Citristrip), wait, and then scrape off the finish. It'd be the chemical equivalent of magic, and this dilemma would be solved once and for all!

Based on the tense I'm using to describe this situation and the dead giveaway of the title of this blog post, you can probably guess that it didn't shake down like that. 

Using the tips I made from bartending all day yesterday*, I gathered the necessary supplies and got to work. All of the labels on the bottles I was using were quite ominous, so I opened a bunch of windows, tied on a bandana, donned protective glasses, and grabbed some rubber gloves. Safety first.

Then, I realized that I couldn't breathe or see, so off came the bandana and glasses. Sorry, safety. If I grow a second head or all of a sudden develop respiratory problems, we know what to blame.

The process of applying the Citristrip to the chairs took approximately one hour, or two episodes of Parks & Recreation (highly recommend: The Fight and The Bubble). First, I wiped the chairs down with a TSP solution to remove any gross stuff that would hinder the stripping process; then, I applied thick, even strokes of the Citristrip (note: the online tutorials I read suggested using cheap foam brushes to do this, but both of the ones I bought started to dissolve and fall apart within about twenty minutes of use, so I bought a cheap one with synthetic bristles that held up better). I waited about 45 minutes before trying to scrape a small section: success! The stain was definitely coming off, but the result was nowhere near as light as what I got when sanding. After scraping down as much of the chair as possible, I hit a second snag. Due to the bizarre (but very cool!) design of these chairs, there are small corners and edges that I can't really fit the scraper tool into — which was one of the big problems with the sanding, too. 

Welllllllllll, crap.

After two applications of Citristrip and vigorous scraping, the chairs are noticeably lighter, but also noticeably a mess. Even after wiping down with some mineral spirits, they're sticky and gloppy and will still require sanding.

Do I want to scream in frustration right now? Yes. I am quite downtrodden. However! I know the sanding process will go a lot faster now that several layers of stain have already been removed, and I know that the Citristrip will be handy in those smaller areas that I can't easily reach with the sander. As long as it's only small detail areas, I think I can handle breaking out smaller tools and putting in the time to get it done. 

Now I just need these two failure chairs to completely dry so I can attack with the sander. I've made a self-imposed deadline to have all the heavy-duty, messy work on these chairs done by this time next week. That means by next Sunday, I need to have the power sanders packed up and put away, the dirty drop cloth gone, and the dining room clean of sawdust and bottles of mysterious chemicals.

Challenge accepted. Now, please excuse me while I finally shower and wallow in beer and more old episodes of Parks & Recreation.


*I bartend part-time, picking up shifts at catered events whenever I need some extra funds. My personal rule is that any money I make in tips is mine to spend, guilt-free, on anything I want. Going to the movies, eating out, or — as is most likely — blowing it all at the hardware store? Totally fine. Remember that the next time you don't tip your bartender: you might be preventing her from spending her Sunday breathing in chemical fumes and getting brown goop all over her clothes. What a jerk.


Project: Dining Chairs

by Lisa Lombardi in ,


Remember that chair I mentioned last time? The one I got for the back balcony that ended up destroying hours and hours of my life because I foolishly refused to give up on it?

It looks like chairs are my kryptonite.

Back when I had an alert set up for "dining chairs" on Craigslist, I got an email with an ad for four of these, for FREE. Right price? Check. And there's something about the style that I think is just so cool. I have no idea what that style is, but I like it. (As far as I can tell, "that" style does not exist.)

The seats are going to get recovered so I can finally try my hand at upholstering, and at first, the plan was to leave it at that. I was going to just clean up the wood a bit and focus my efforts on the seats. But then they sat around in my dining room for a week, and the darker wood didn't look right with any of the patterns and colors I was leaning toward. And even after I wiped them down with some Murphy's, there was still this gross waxy film that I didn't want to think too hard about. And I wasn't loving how the finish of the chairs went with the wood floor and the wood paneling on the walls.

And then I wondered: what if I sanded down the current finish and redid it? They're always doing it on HGTV shows and Apartment Therapy and all over the interwebs, so why couldn't I? So I sanded a small part on the underside of one of the chairs, just to see what it would look like.

I loved it. I loved it just as it was, lighter and more casual and soft to the touch. It reminded me of driftwood, and would look amazing with a colorful tribal pattern or something a little more boho.

Before I knew what I was doing, I had started sanding the top side of the chair, merrily going along my way. Sanding. And sanding. And sanding. Twenty minutes passed, and I remembered something: I HATE sanding. The sound is grating and gives me goosebumps and it's slow and it makes a big mess and it's SLOW.

I broke out the power sander, sure that it would be my savior. But after only another twenty minutes or so, I had to stop because I couldn't feel my hands anymore.

These four chairs have been sitting in the dining room for MONTHS now. Every time I try to get a little more work done, I don't last more than an hour before I have to give up again, and I'm left covered in sawdust, ears ringing, hands still vibrating.

I don't know what to do. I still really like the chairs. And a recent compliment from Andy's aunt confirmed that they are, actually, really nice. But I can't keep letting this project drag. The dining room — which, in my defense, barely got used to begin with — is now a wreck of sandpaper, rags, power tools, and unusable space. It's the only common room in the apartment left that I haven't fixed up yet, and I was really hoping to get the ball rolling with these chairs.

But, guys. The SANDING. It's killing me.

What do I do? Give in and junk them? Stick with it? Anyone know some tricks to make sanding less painful? I'm thinking of trying a chemical stripper, but they sound kind of scary. Help!


Date Night Win: Pie Hard

by Lisa Lombardi in ,


A little over a year ago, I successfully guilted my boyfriend into dating me. I was pretty pleased with myself until I realized that we couldn't just spend all of our time watching episodes of Project Runway or debating the pros and cons of mayonnaise (don't worry, we still do that a lot). 

So, for those of you as inexperienced with this thing called "dating" as I am, I present to you this series of awesome date ideas. First up?

One amazing movie. One delicious pie. Just the way I like it.

One amazing movie. One delicious pie. Just the way I like it.

"Lisa," some of you might be saying, "Baking pie and watching Die Hard isn't romantic." And to that, I'd ask, "But it's awesome, isn't it?"

Some of you may reply, "No." And to those, I'd ask you to kindly leave and never read my blog again.

I have very strong feelings about a handful of things in life: Listening to Journey will never not cheer me up. Moms love Michael McDonald (it's a proven fact). Bread should be its own legitimate food group. The only way time-tested action movies can be improved is by puns and baked goods.

Luckily, my boyfriend shares that last belief with me. So, for one random Friday night, we did Pie Hard: Die Hard & Buttermilk pie.
 

Tim's Mom's Southern Buttermilk Pie (Makes 1 pie)

2 eggs
2 tablespoons unsalted butter
1 1/4 cups sugar
3 tablespoons flour
2 teaspoons lemon juice (or more, if you'd like)
1 teaspoons lemon zest
1 1/2 cups buttermilk (room temperature)

Preheat the oven to 425 degrees.

  1. Separate the egg whites and beat until stiff. Set aside.
  2. Cream together the butter and sugar until soft and fluffy.
  3. Mix in the egg yolks, one at a time, and the flour. 
  4. Continue beating and slowly add the buttermilk.
  5. Stir in the lemon juice and zest.
  6. Gently fold the egg whites into the mixture and pour into a pie shell.
  7. Place the pie on the bottom shelf of the oven and bake at 425 for fifteen minutes. Reduce the temperature to 325 and bake for an additional 30 minutes or until filling is set and doesn't jiggle.
They say lightning never strikes twice...They were wrong!

They say lightning never strikes twice...They were wrong!

Valentine's Day was Pie Hard 2: Pie Harder, in which we enjoyed a viewing of Die Hard 2 paired with chicken pot pie and buttermilk pie.

This time, it's delicious.

This time, it's delicious.

Our one-year anniversary was the most ambitious effort yet: Pie Hard with a Vengeance. Die Hard 3, a variety of mini quiche, steak & ale pie, and coconut key lime pie.

It goes without saying, but don't plan on doing anything more vigorous than going to bed after celebrating in this manner. Enjoy!


My Room: Today

by Lisa Lombardi in ,


From ominous, possibly haunted beginnings, it's progressed to this.

IMG_3611.jpg

My room came together a lot more quickly than the kitchen because (A) I needed somewhere to sleep and (B) I actually had pretty much all of this stuff when I moved in. This time. When I first moved to Boston, I only brought with me whatever I could cram into my 2000 Honda CRV. It was a surprisingly substantial amount, but left me with a lot of major pieces to acquire. AND ACQUIRE, I DID.

Hello, Bed: the mattress was a much-appreciated gift from Adrienne's husband, Dominik. He's a pretty tall guy, and that in combination with the fact that he now has to share his bed with another person on a daily basis makes me feel confident he won't be asking me for his Full-sized mattress and boxspring back any time soon. At least, I really hope not. The frame is a Craigslisted Ikea Fjellse that I stained to match my nightstand. My bed was previously owned by a college student moving back to her home in Africa, was yours?

Nightstand: Aside from my dad's trunk, this is one of the few pieces I brought with me to Boston. I Craigslisted this back when I was working for Men's Health and living in Emmaus, Pennsylvania (an experience that has made me swear off the entire state for, God willing, the rest of my life). It was originally this weird orange-maroon color, and the top was a ridiculously heavy slab of marble. I initially spray painted the whole thing an obnoxious shade of lime green because, I figured, if you can't have questionably ugly furniture when you're in your early 20s and live alone, when can you? I later stripped off alllllll the paint, replaced the marble with wood, and stained it. It's really not the best quality piece of furniture, but I LOVE IT. Mmmm...woven panels and tapered legs.

Bookshelf: Craigslisted for the entry of my last apartment, it used to hold Adrienne's and my shoes, boots, etc. that were used on a regular basis, because — and I can't emphasize this enough — it's just a crappy bookcase from Target or something. You know those people who fill their apartments only with furniture and knick knacks that have a rich back story or are genuine, vintage designer pieces? I'm not one of them. I make do with I have until I can find/afford something better. It doesn't actually hold too many books because I'm the last person on the planet under the age of fifty who still loves going to the library.

Desk: Purchased from West Elm. Hahahaa just kidding, yeah right. CRAIGSLIST. Are we seeing a pattern here? The top is some crappy manufactured fake wood thing, but I love the legs. I might make a new top one day. When I've completely run out of other things to do with my life.

IMG_3577.jpg

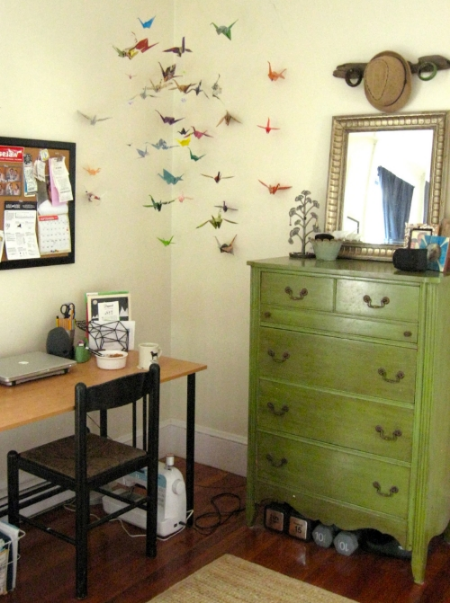
Dresser: Craigslisted from a cute couple in the Back Bay. They responded to my email request, they told me, because I said that I "LOVED" the color. And I do! It's one of those things that I would never buy if I saw it in a store, and would never think to recreate the look of, but it feels really perfect with the rest of my stuff in here. We ended up trading road trip tips when I went to pick it up, and I told them which parks in Utah to set aside time for. It was the kind of exchange that warms my cold, dead heart. The third drawer is kind of broken, but still functions, so I ignore it. For now.

Things that nobody other than me cares about: My pineapple lamp from HomeGoods! (Holy crap, something purchased at a real store.) Gallery of vintage-style National Parks post cards were collected on my cross-country road trip. Prints are care of Marc Johns and Berkeley Illustrations and posters are reprints of lovely WPA National Parks designs. Everything else was collected over the past five years from various sources, because I would totally be a hoarder if not for the fact that sustained clutter gives me a panic attack.

And one last thing:

Flock of paper cranes: Frustrated with the soul-crushing boredom of a summer magazine internship I did just before my senior year of college, I took to folding these at my desk whenever I was left without a task to work on. Which was 90% of the time. These have been with me for five years and have survived SIX MOVES, bless their little paper wings.

So that's the bedroom. A couple helpful hints you might never have thought of:

  1. Wool blankets make EXCELLENT blackout curtains, and can cost less, too (check your nearest Army Navy store, which will either be sketchy or awesome. Possibly both). This time around, I used pins instead of sewing to create the pocket for the curtain rod so I can still use the blanket if the time comes that I need to purchase actual curtains.
  2. That trick with using binder clips on the desk to keep cords corralled? Works like a charm.
  3. Rugs are annoyingly expensive, so if you just need something basic and not too huge, sewing together a couple smaller ones is an easy, inexpensive option. In my room, I have two smallish jute rugs that I sewed together with clear fishing line, and since it's a flat weave but still has texture, no one has ever noticed. (Bonus: they were purchased at Kohl's with some of their ubiquitous coupons.)
  4. Try propping open your coffee table books (or children's books with beautiful illustrations — I'm looking at you, Leo Lionni) to show off the pages as art.